



The Bottom Line
Most leaking faucets are caused by a worn washer, O-ring, or valve seat, or a failing cartridge and in Midland, that wear happens faster because of the city’s hard water. Simple drips are usually a safe, legal DIY fix for your own home in Texas.
Persistent leaks, pressure related drips, or leaks that return after a repair are your cue to call a licensed plumber. That drip you keep hearing at 2 a.m. isn’t your imagination, and it isn’t nothing, either. It’s also probably not a crisis.
A leaking faucet sits in an odd middle ground: annoying enough to notice, yet easy enough to ignore, and if you actually look into it, pretty simple to understand once you know what’s going on inside the fixture.
This guide walks you through why faucets leak, how to identify the actual issue before you touch a wrench, what the repair costs, and when it’s smarter to stop and call a professional. We’ll also get into something most guides skip entirely: why Midland’s water makes this problem show up sooner and more often than it does in most parts of the country
What You’ll Learn
What’s Actually Causing Your Faucet to Leak
- Most faucet leaks trace back to one of four worn parts: the washer, the O-ring, the valve seat, or the cartridge. Midland’s own published water hardness 400 to 600 parts per million, according to the City of Midland speeds up corrosion and mineral buildup inside faucets.
- A dripping faucet usually isn’t an emergency, but it isn’t free, either. The EPA estimates the average household’s leaks waste more than 9,000 gallons of water a year.
- Texas homeowners are legally allowed to repair their own primary residence’s plumbing without a license, thanks to the state’s homestead exemption but that doesn’t mean every leak is worth tackling yourself.
- National data puts a typical professional faucet repair somewhere between $125 and $350. No Midland-specific pricing is publicly available, so treat that range as a starting point, not a quote.
Is a Leaking Faucet an Emergency?
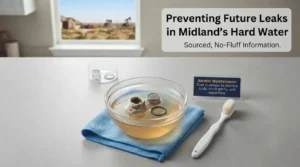
Base, a common sign of a worn or
damaged O-ring.
Short answer: usually not. A faucet that drips steadily, even if it’s driving you crazy, is a maintenance issue, not a five alarm plumbing emergency. It’s not going to flood your kitchen overnight, and it’s not putting your home at structural risk on its own.
When it can wait
If the drip is slow, consistent, and hasn’t changed in volume, you have time to read this whole article, figure out what’s wrong, and decide whether you want to fix it yourself or schedule a plumber for a normal appointment.
There’s no reason to panic call anyone at 11 p.m. over a faucet that’s been dripping the same way for a few days.
When it can’t
A few situations do call for faster action:
- The leak suddenly gets noticeably worse, or water starts flowing rather than dripping.
- You can’t find a shutoff valve under the sink to isolate the fixture, which means you can’t easily stop the water if it worsens.
- You see actual water damage soft or discolored cabinet wood, staining on the countertop, or pooling water rather than just the drip itself.
If any of those apply, that’s the point where “annoying” turns into “handle it now,” and it’s worth calling a plumber the same day rather than waiting.
What’s Actually Causing Your Faucet to Leak
Here’s the part most articles get backwards: they organise by part name (washer, O-ring, valve seat) before you even know which part is the problem.
It’s more useful to start from what you’re actually seeing at the sink, because that’s how most people notice the leak in the first place.
Drip from the spout (worn washer or valve seat)
If water is dripping steadily out of the spout itself, even when the handle is fully closed, the most common culprits are a worn washer or a corroded valve seat.
In a compression-style faucet (the classic two handle design), the washer presses against the valve seat to form a watertight seal every time you shut the handle off.
Thousands of open and close cycles eventually flatten or crack that washer, and once it can’t seal properly, water sneaks past it and drips out the spout.
The valve seat itself, the connection point between the faucet body and the spout is also a common failure point. Sediment and mineral content in the water can settle there over time, corroding the metal and preventing a clean seal even with a healthy washer.
Leak at the base or around the handle (worn O-ring or loose packing nut)
If the water is showing up around the base of the faucet or seeping out near the handle rather than the spout, look at the O-ring.
This is a small rubber ring that seals the connection between the handle and the faucet body. O-rings harden and crack with age and with repeated exposure to hot water, and once that happens, water finds its way around the handle instead of staying inside the fixture.
A loose packing nut or adjusting ring can cause the same symptom. These parts hold the stem assembly snug, and normal use can work them loose over months or years. Sometimes tightening them is enough on its own, no replacement parts required.
Faucet is hard to turn or squeaks (corrosion, mineral buildup)
A faucet that’s becoming stiff, sticky, or noisy to operate is usually telling you that mineral deposits are building up inside the mechanism, not that a seal has failed yet.
This is often an early warning sign rather than an active leak and it’s worth paying attention to, because in a hard water area, buildup left alone tends to progress into an actual drip.
Leak that worsens when other fixtures are on (water pressure issue)
This one’s a useful diagnostic trick: turn on another faucet, a shower, or an appliance that uses water, and watch whether the leaking faucet’s drip picks up.
If it does, high water pressure is likely straining the internal seals and components every time demand shifts elsewhere in the house. This is one of the few faucet leak causes that isn’t really a DIY fix; it usually calls for a plumber to check pressure and, if needed, install a pressure reducing valve.
Why Midland’s hard water makes this happen faster
Here’s the local piece that most guides never touch: the City of Midland’s own published water quality information states that the city’s water hardness runs between 400 and 600 parts per million (ppm) , a figure straight from the city’s water quality FAQ. By any standard water-hardness scale, that’s firmly in “very hard” territory.
What that means in practice is that every one of the causes above valve seat corrosion, aerator clogging, mineral buildup inside the cartridge happens on a shorter timeline in Midland than it would somewhere with soft municipal water.
It’s not that Midland faucets are built differently. It’s that the water running through them is carrying a heavier mineral load every single day, and that mineral load accelerates wear on the exact parts that control the seal.
(A note on precision here: several third-party water quality websites publish grains per gallon estimates for Midland that vary quite a bit from one another.
Because that spread is wide and inconsistent, this guide relies on the City of Midland’s own stated ppm figure rather than picking one of the competing third-party numbers.)
Compression, Cartridge, Ball, or Ceramic Disc: Which Faucet Do You Have?

Before you buy replacement parts, you need to know what kind of faucet you’re working with, since the internal mechanism and the fix is different for each type.
Quick visual ID guide
Compression faucet: Two separate handles, one for hot and one for cold. You’ll usually feel it get slightly harder to turn as it closes, right before it shuts off. This is the classic washer and valve seat design.
Cartridge faucet: Can be single or double handle, and turns smoothly with a light, consistent feel rather than tightening at the end. Instead of a washer, a replaceable cartridge controls the flow of hot and cold water.
Ball faucet: Common on single-handle kitchen faucets. You’ll notice the handle moves in a full range of motion up and down for volume and side to side for temperature, sitting on a rounded ball mechanism rather than a straight-up-and-down cartridge.
Ceramic disc faucet: Usually a single lever that moves smoothly and doesn’t drip on a delay when shut off. Inside, two ceramic discs slide against each other to control flow, which is why these tend to be the most durable and longest lasting design.
If you’re not sure which one you have, the simplest test is how the handle feels when you turn it: a tightening resistance near the shutoff point points to compression; a smooth, consistent turn points to cartridge, ball, or ceramic disc.
Is It Legal and Safe to Fix This Yourself in Texas?
This is a question almost no plumbing article actually answers, and it matters more than people realize.
The homestead exemption, explained plainly
Under the Texas Occupations Code (Chapter 1301, specifically Section 1301.054), the state grants what’s known as a homestead exemption: a property owner is allowed to perform plumbing work including faucet repair on their own primary residence without holding a plumbing license.
This exemption exists because Texas draws a clear line between protecting the public from unlicensed contractors working on other people’s homes, and letting you fix your own sink on your own property.
So yes in most cases, replacing a washer, O-ring, or cartridge in your own home is both legal and safe, provided you follow basic precautions like shutting off the water supply first.
What’s outside the DIY line
This exemption is specific and doesn’t cover everything with a pipe attached to it. A few important boundaries:
- It applies to your own homestead your primary residence. It does not extend to rental properties you own but don’t live in, or to commercial buildings.
- Gas line work is treated separately and isn’t something to take on without a licensed professional, given the safety risk.
- Water heater installation and any work that involves running new water or drain lines typically falls outside routine “homeowner repair” territory and is best left to a licensed plumber, partly because of code and permit requirements.
For a straightforward faucet repair on the home you live in, though, you’re on solid legal ground doing it yourself.
How to Fix a Leaking Faucet Yourself
If your leak matches the simple, non-emergency profile described earlier, here’s the general process. The exact part you’re replacing will depend on which faucet type you identified above, but the sequence is consistent across all of them.
Tools you’ll need
- Adjustable wrench or basin wrench
- Flathead and Phillips screwdrivers
- Replacement washer, O-ring, or cartridge matched to your faucet’s brand and model
- A small towel or rag (to catch drips and protect the sink finish)
- Plumber’s grease (optional, but helps new parts seat and move smoothly)
Step 1 Shut off the water
Look under the sink for the fixture’s dedicated shutoff valves and turn them clockwise until they stop. If your sink doesn’t have individual shutoffs, you’ll need to shut off the main water supply for the house instead.
Once the water’s off, turn the faucet handle on to release any pressure left in the line and let residual water drain out before you start disassembling anything.
Step 2 Disassemble the handle
Most handles are held on by a single screw, sometimes hidden under a decorative cap that pops or unscrews off. Remove the screw, then gently lift or wiggle the handle free.
As you go, set each piece down in the order you removed it this sounds like overkill until you’re staring at four unlabeled parts trying to remember which one came out first.
Step 3 Identify and replace the worn part
With the handle off, you’ll be able to see the stem, cartridge, or ball assembly underneath. Inspect the washer or O-ring for obvious wear flattening, cracking, or a hardened texture that’s lost its flexibility. If you’re working with a cartridge faucet, the cartridge itself typically pulls straight up and out once a retaining clip or nut is removed.
Replacing whichever part shows wear with an exact match for your faucet’s brand and model, not a generic “universal” substitute, mismatched parts are one of the most common reasons a DIY repair doesn’t actually solve the problem.
Step 4 Reassemble and test
Put everything back in the reverse order you removed it, hand-tightening fittings before giving them a final snug turn with a wrench overtightening can crack new parts just as easily as it wears out old ones. Turn the water supply back on slowly and check for leaks both at the spout and around the handle.
How to confirm the leak is actually gone (water meter test)
Don’t just eyeball it for thirty seconds and call it done. The most reliable check is the same one the EPA recommends for finding leaks in general: read your water meter, avoid using any water for about two hours, then check the meter again.
If the reading hasn’t moved, your repair holds. If it has, there’s still a leak somewhere, possibly the same faucet, possibly something else and it’s worth a closer look before you consider the job finished.
When to Stop and Call a Plumber
DIY faucet repair has a real ceiling, and knowing where it is saves you from turning a $10 part into a bigger problem.
The leak comes back after a DIY fix
If you’ve already replaced the obvious worn part and the drip returns within days or weeks, something else is going on: a second failing part, a valve seat that needs more than cleaning, or a part that wasn’t actually a correct match. At that point, a plumber’s diagnostic experience is worth more than another trip to the hardware store guessing at parts.
Your faucet doesn’t match a standard design
Some faucets, particularly certain disc or canister style models, don’t use a traditional washer at all, and the repair approach is different enough that it’s easy to cause more damage trying to force a standard fix onto a non-standard design.
Low pressure elsewhere in the house
If the leaking faucet is happening alongside reduced pressure at other fixtures, you’re likely looking at a whole house pressure issue rather than something isolated to that one faucet, and that’s a job for a professional assessment.
Visible water damage
Soft cabinet wood, staining, or a musty smell near the sink means water has been getting somewhere it shouldn’t for a while. At that point, you’re not just fixing a faucet, you may be dealing with damage that needs its own repair, and it’s worth having a plumber look at both issues at once.
What Does Faucet Repair Cost?
Straight talk: there’s no publicly verifiable Midland specific pricing data for faucet repair, and this guide isn’t going to make up a number to sound more local. What follows is national cost data from established third party sources, offered as a general reference point not a quote.
| Repair Type | Typical Cost Range | Source |
|---|---|---|
| Washer, O-ring, or aerator swap (simple) | $75 – $175 | PlumbingPriceGuide.com, 2026 |
| Standard faucet repair (e.g., cartridge) | $150 – $350 | ConsumerAffairs, 2026 |
| Faucet repair, general national average | $269 – $324 | Homewyse, May 2026 |
| Full faucet replacement, installed | $170 – $690 | Angi / homeyou, 2026 |
| Typical plumber hourly rate | $45 – $200/hr | ConsumerAffairs / Angi, 2026 |
A note on these numbers: these are national averages pulled from third-party cost estimation and home services sites, not quotes from any specific company and not adjusted for Midland or West Texas labor rates. Actual cost depends on the faucet’s age, brand, the specific part that’s failed, and what a technician finds during an on-site look. Treat this table as a ballpark for planning purposes, not a promise.
Repair vs. replace how to decide
If the faucet is otherwise in good shape with no visible corrosion on the body, no history of repeated leaks a repair is almost always the more affordable route, and the cost table above reflects that it’s typically well under the price of a full replacement.
But if you’re on your second or third repair for the same fixture, or the faucet itself is old enough that matching parts are getting hard to find, replacement often ends up being the more sensible long term choice rather than paying for repeated repairs on a fixture that’s simply worn out.
How Much Water (and Money) a Leaking Faucet Actually Wastes
It’s easy to shrug off a drip as “not that much water.” The numbers say otherwise.
According to the EPA’s WaterSense program, the average American household’s leaks combined across faucets, toilets, and other fixtures waste more than 9,000 gallons of water every year, and roughly 9 to 10 percent of homes have leaks bad enough to waste 90 gallons or more in a single day.
Zoomed out further, EPA estimates that minor, easily fixable household leaks nationwide add up to nearly 1 trillion gallons of wasted water annually.
Fixing these kinds of leaks isn’t just a conservation talking point. EPA specifically notes that repairing easily corrected household leaks can save homeowners around 10 percent on their water bill.
That’s a meaningful number for a fix that, per the cost table above, often runs under $200.
Preventing Future Leaks in Midland’s Hard Water
Given how much of this article traces back to Midland’s mineral heavy water supply, prevention here is really about staying ahead of that mineral buildup rather than waiting for it to cause a failure.
Maintenance Checklist
. Clean the aerator every 2–3 months by unscrewing it and soaking it in vinegar to dissolve mineral buildup
.Periodically check that under-sink shutoff valves still turn freely, so you’re not caught without a working shutoff during an actual leak
. After any hard freeze, check outdoor faucets and hose bibs for slow drips that might indicate freeze related cracking
.Replace washers and O-rings proactively when you notice a faucet getting stiff or squeaky, rather than waiting for a full drip
Occasionally check your water meter using the EPA’s two hour no-use test to catch slow leaks before they show up on your water bill.
Expert Tips
- Shut off the water at the fixture’s own shutoff valve, not just the handle the handle only stops flow through the faucet, it doesn’t isolate the supply line behind it.
- Lay disassembled parts out in the order you removed them. Reassembling in the wrong order is one of the most common reasons a straightforward DIY repair doesn’t actually fix the leak.
- Matching replacement parts to your faucet’s exact brand and model rather than grabbing a generic “universal” washer or cartridge mismatched parts are a frequently reported reason leaks return shortly after a repair.
- In a hard water area like Midland, soak metal components in a vinegar solution before reassembly. Even a brand-new part won’t seal properly against mineral buildup left on the surrounding surfaces.
(These tips reflect general, widely applicable plumbing practice rather than a specific technician’s personal case history, since no first-hand company case data was available for this guide.)
DIY vs. Professional Quick Comparison
| Situation | DIY-Appropriate | Call a Plumber |
|---|---|---|
| Simple drip from spout, faucet turns normally | ✓ | |
| Leak at handle base, standard two-handle faucet | ✓ | |
| Leak persists after a DIY part replacement | ✓ | |
| Faucet has no visible washer (disc/canister style) | ✓ | |
| Leak worsens when other fixtures are running | ✓ | |
| Low water pressure elsewhere in the house | ✓ | |
| Visible water damage to cabinet or flooring | ✓ | |
| Repair is on a rental or commercial property | ✓ (homestead exemption doesn’t apply) |
FAQs